Larger Chevron Button

Canvas Applications


API Names

Canvas applications can now call another via a Service node enabling the first application to use reasoning from the second application. In addition, Workflow Service nodes will be able to call a Canvas application enabling the Workflow to use reasoning defined in the Canvas application. This is possible as all variables in Canvas applications will automatically be assigned API names. All Ask nodes will be defined as inputs whereas all other variables will be defined as outputs.

Workflow

Return Event Node

Version 10.8 has added the Return Event node in Workflow. The Return node enables users to complete a task and then enable a new user to return to the same task on a new session. The Return node is useful for Workflows that require multiple user reviews, escalating cases or commenting and approval. With the Return node, authors can simplify these types of Workflows both visually and functionally.

Let's create an example Workflow using the Return node

1. Create a Workflow loop as pictured below.
 
You may use any application as App 1 to test this Workflow.
Workflow 1-1

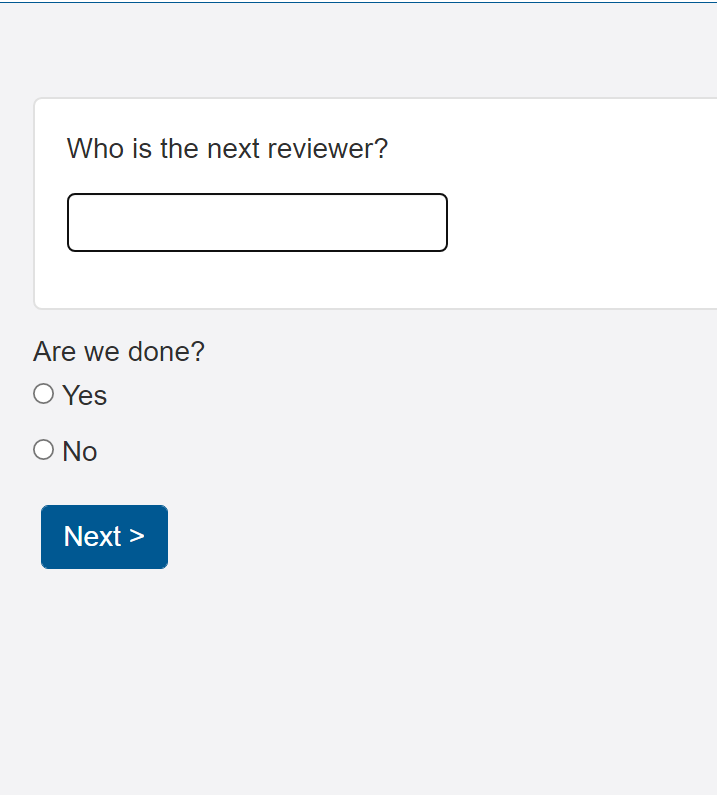
2. Include a text and a yes/no question variable at the end of App 1.

Workflow 2-1

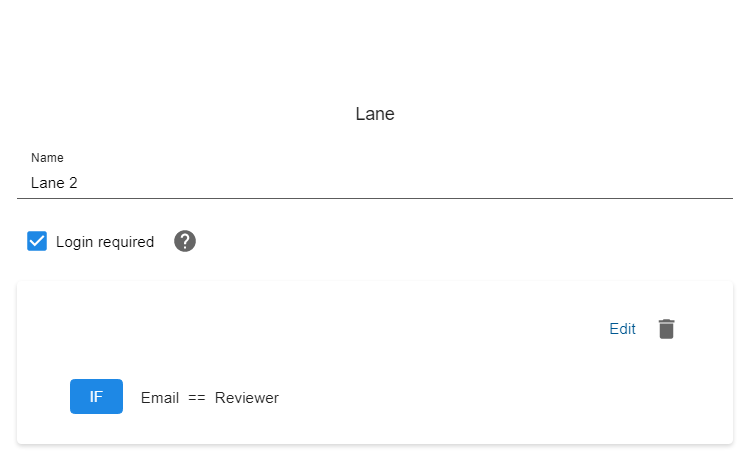
3. Set a condition in lane 2 using the variable input from 'Who is the next reviewer'. Tick 'Login required'.

This uses the text variable input from step 2.

Workflow 3

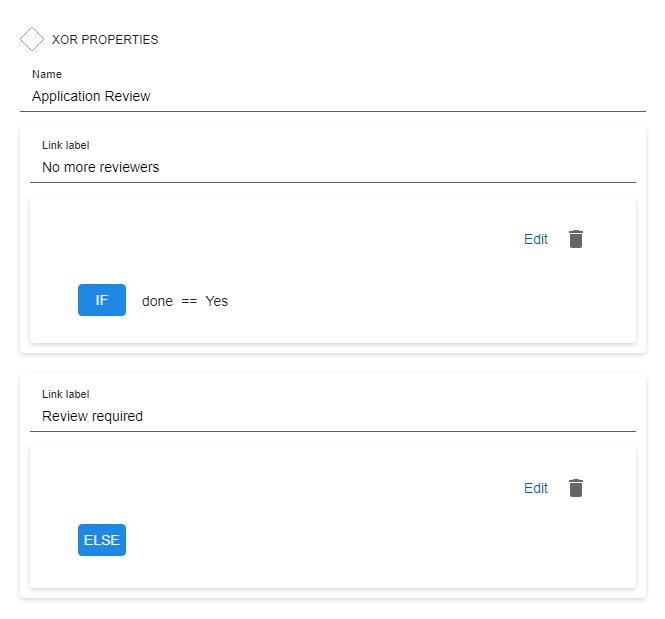
4. Create separate conditions in the 'Application Review' XOR gateway; one leading to the Return node, another leading to an End node or separate lane.

This uses the yes/no question variable input from step 2.

Workflow 4
5. Run the Workflow. At the end of the application, enter an email for user 2 and select 'No'.


Workflow 5

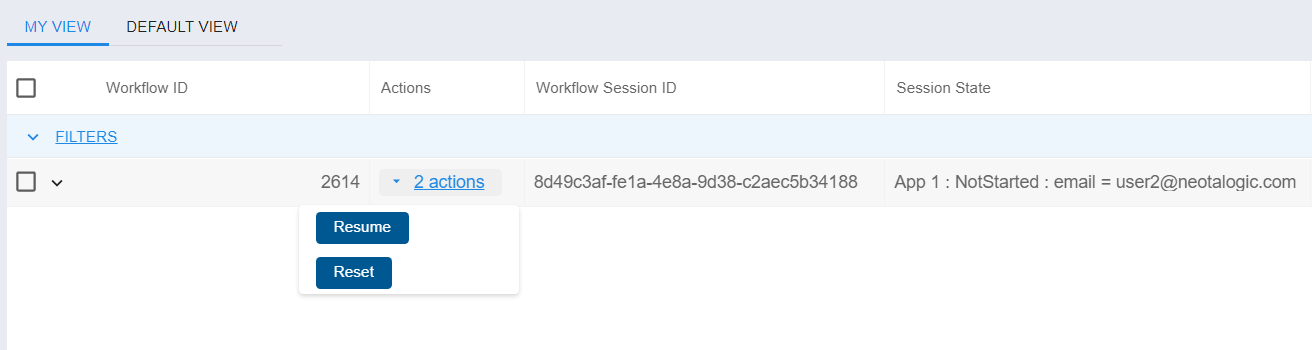
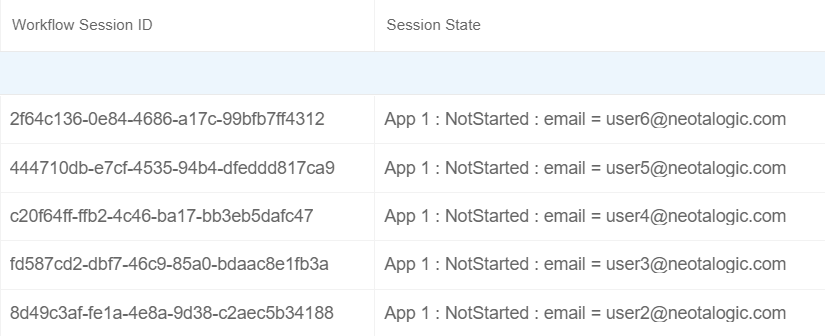
6. The Email node will send an email to user 2 and the Workflow will reach the Return node changing the Session State to 'App 1: NotStarted : email = user2'.


Workflow 6

7. User 2 can resume the session from Sessions View or by a Workflow Resume URL email.


Workflow 7

8. This Workflow loop can be run as many times as required with as many new users as required until 'done = Yes' in the 'Application Review' XOR gateway.

Consult the User Manual for further information on the Return node.

Workflow 8

New Actions

Workflow Actions can contain three new Task nodes; Email, Call and Service tasks in addition to Application tasks. This will enable authors to construct more flexible and useful Actions.

NLS 10.8 Actions
Actions 2

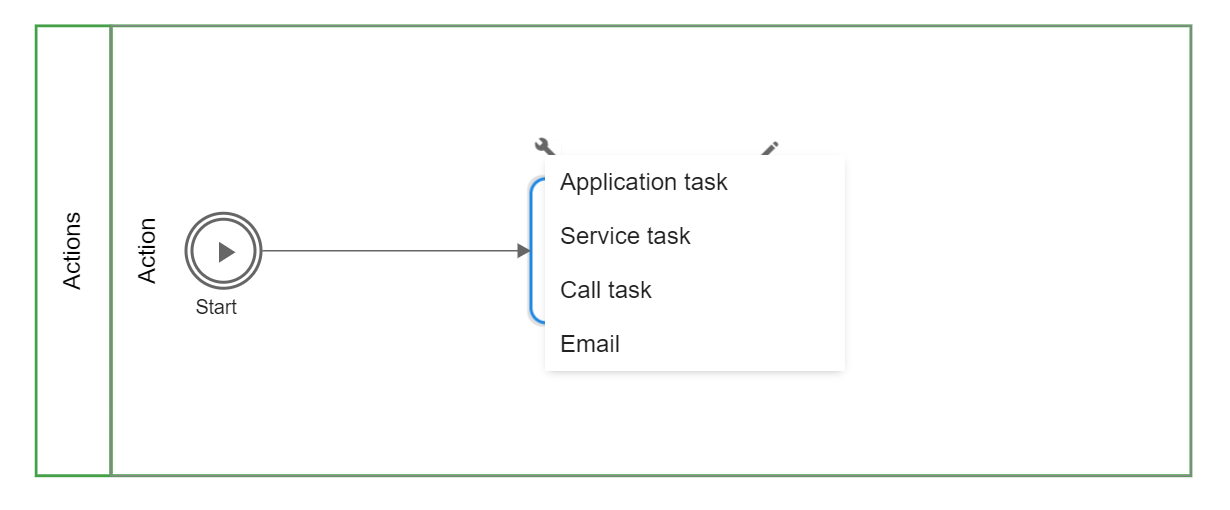
For end users, these additional functions are invoked in the same way as an Application Task Action; In Sessions view, run the desired Action from the relevant Session.

Sharing Workflows with limited application access

Version 10.8 increases the range of permissions available when sharing a Workflow.
 
When the author of a Workflow wants to enable users or groups to run the Workflow and included applications within the Workflow, those users or groups should not have permission to run or edit the included applications.
Sharing workflows 1

The settings above would allow 'Workflow User' to run the Workflow and to do nothing else. The 'Test Users' group can run and share the Workflow as well as view and edit the sessions/dashboards.

NDM Read

(Retrieve All)

NDM Read operations will now be able to read a single Session State rather than reading an entire Row Reference. Authors will be able to utilise NDM Read (Retrieve All) to specify a condition based on a session state in which NDM will retrieve specific Row References that have completed successfully or Workflow Sessions that have ended with a specific end state.
 
How to use this new NDM Read feature:
1. Create a new NDM Read operation in Studio.
2. Sync to the appropriate database via Data Manager.
3. Select the group 'Application Data' and choose 'Retrieve All'.
4. Choose 'Custom' and select the variable 'Session State' from the first condition drop-down.
5. Adjust the expression and the variable from the second condition drop-down to specify the parameters of the Session State.
 
It is not yet possible to retrieve Core Workflow properties with NDM Read. This will be implemented in a future release.
NDM Read 1

Document Automation

Workbench now supports re-import of Word Templates

Workbench now enables authors to re-import a Word template via the create new/import application dialog giving authors the option to update or add variables in existing applications. All variables from the Word template are now automatically synchronised to NDM. This streamlines the NDM process for new and existing applications. Additionally, upon importing a Word template for the first time, a NDM Write operation will automatically be created.

NLS 10.8 Reimport
Upon importing a Word Template, a user will have two options:
1. Import a Word template for the first time creating a new application.
2. Re-import a Word template updating an existing application.
 
Variables and conditions that are added, deleted or edited in your Word template can be updated upon re-import by selecting the correct 'Target App' on the 'Application Import Details' dialog.
Re-import 2

Neota Library

Use Case Templates are designed to jump-start your own solutions by providing key workflow elements and a pre-built structure to streamline your projects. The Use Case Templates are stored in our Neota Library that can be accessed through Workbench.

New Use Case Template: Request for Proposal (RFP)

The Request for Proposal (RFP) Use Case Template is designed to provide you with the core structure of an RFP solution that you can then customize to your organisations requirements. We know RFPs change across and within companies, so this is designed as a template that is configurable in two keys ways:
 
1. Each RFP can be configured by end users. Your users can define the RFP questions without the need of any authoring tools.
2. The overall process and all the details can be configured using our Studio and Workflow tools. 
The solution is set up to enable a business user to request an RFP, and create their own questions on up to 3 forms, with custom weighting applied. This information is passed to a reviewer (for example, procurement) who can edit and update the questions. Once the RFP is finalised, the vendors are identified, and are emailed requesting their response.
 
The vendors can then respond to the customised questions created for the RFP and any questions that you would like built in to all of your organisations RFPs.  As vendors respond an email notification is sent, with a link to a dashboard that enables three core processes:
 
1. Review individual vendor responses and assign weights.
2. Compare vendor responses, question by question.
3. Award the RFP, which notifies the successful vendor and any unsuccessful vendors. The RFP and the responses are tracked as the RFP progresses. 
In the User Manual you will find further information including a walkthrough video, and instructions on setting up the workflows.
 
See the following link for a previous Use Case Template – Master Services Agreement (MSA).